이 글은 평범한 취준생이 평범하게 자신이 당일 배운것들과 느낀점들을 쓰기 때문에 정보가 정확하지 않을 수 있습니다.
다시 지옥같은 월요일이 시작되었다. 이걸 쓰고있는 와중에도 피곤함이 나를 찌르고 있지만, 오늘 내가 한것을 까먹지 않기 위해 오늘 한것들을 작성해보겠다.
1. 벽이 없어지는 화면 카메라 전환
주말에 따로 에셋까지 따로 찾아서 배치까지 했으니, 정답 아이템을 찾아서 누르면 벽이 없어지도록 하는 화면을 연출하고 싶었다. 이때 사용한 것이 카메라의 우선순위이다. 카메라의 우선순위를 코드에서 바꾸어주면 메인 카메라가 해당 카메라의 위치로 찍으러 간다. 해당 카메라의 위치에 자리를 잡은 후에, 벽에 중력을 주어 내려가도록 했고, 내려가기만 하고 없어지지 않으면 안되니 텀을 주어 없어지도록 하였다.
using Cinemachine;
using System.Collections;
using UnityEngine;

public class KeyEvent : StageEvent
{
    [Header("상호작용에 따른 카메라 전환")]
    public CinemachineVirtualCamera cam;

    [Header("떨어질 큐브")]
    public GameObject fallenCube;

    private int eventCount = 0;

    public override void DoEvent()
    {
        if(eventCount == 0)
        {
            ChangeCam(cam, 200, 2);
            eventCount++;
        }
    }

    //떨어뜨릴 큐브에 중력 부여
    public void FallCube()
    {
        fallenCube.AddComponent<Rigidbody>();
        StartCoroutine(RemoveCube(3f));
    }

    //3초뒤 자동으로 사라짐
    private IEnumerator RemoveCube(float delay)
    {
        yield return new WaitForSeconds(delay);
        fallenCube.SetActive(false);
    }

    protected override IEnumerator ChangeCamPriority(CinemachineVirtualCamera cam, int priority, float delay)
    {
        int originalPriority = cam.Priority;
        cam.Priority = priority;

        yield return new WaitForSeconds(delay * 0.5f);

        FallCube();

        yield return new WaitForSeconds(delay * 0.5f);

        cam.Priority = originalPriority;
    }
}
using Cinemachine;
using System.Collections;
using UnityEngine;

public class StageEvent : MonoBehaviour
{
    public virtual void DoEvent() { }

    //코루틴 실행
    protected virtual void ChangeCam(CinemachineVirtualCamera cam, int priority, float delay)
    {
        StartCoroutine(ChangeCamPriority(cam, priority, delay));
    }

    //카메라를 delay동안 순위를 priority로 바꿈
    protected virtual IEnumerator ChangeCamPriority(CinemachineVirtualCamera cam, int priority, float delay)
    {
        int originalPriority = cam.Priority;
        cam.Priority = priority;

        yield return new WaitForSeconds(delay);

        cam.Priority = originalPriority;
    }

}
기본적으로 StageEvent를 상속받고, 카메라의 우선순위를 바꾸는건 기본적으로 제공해준다. 다만 KeyEvent같은 경우에는 중간에 벽에 중력을 주고 3초 후 사라지는 코드가 들어가야 하므로, 해당 함수를 따로 override하여 재정의하였다. 벽이 3초 뒤에 사라지는 것은 Coroutine을 이용하여 작성하였다. 그리고 해당 이벤트는 한번만 하고 다시는 작동하지 말아야 하므로, eventCount를 통해 1번만 작동하도록 설정하였다.
2, 기억의 미로
이름만 들으면 거창해 보이지만, 그냥 투명 미로이다. 그렇다면 해당 길을 그냥 더듬어서 찾아가야 하는가? 그건 아니다. 시작전에, 지도 아이템을 통해 해당 미로의 윗 부분을 보고 투명 미로의 길을 기억해서 탈출하는 기믹이다. 우선 투명벽으로 이루어진 미로와 그냥 벽으로 이루어진 미로를 각각 준비한다.

해당 아이템과 상호작용하면, 카메라의 우선순위를 바꾸어서 벽이 보이는 미로쪽의 카메라 위치로 이동 후 10초동안 보여주고, 다시 원래 플레이어를 비추는 카메라의 위치로 돌아온다.
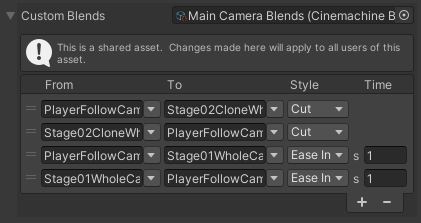
다만 이번에는 카메라가 부드럽게 이동하는 것이 아닌, 이동하는 과정을 생략하고 바로 벽이 있는 미로의 모습을 보여주었다. 이는 CinemachineBrain에 있는 Custom Blend에서 플레이어를 찍는 카메라에서 벽이 있는 미로를 찍는 카메라로 갈 때의 설정을 Cut으로 변경해주었기 때문이다.
using Cinemachine;
using UnityEngine;

public class MapEvent : StageEvent
{
    [Header("상호작용에 따른 카메라 전환")]
    public CinemachineVirtualCamera cam;

    public override void DoEvent()
    {
        ChangeCam(cam, 200, 10);
    }
}
MapEvent코드에서는, KeyEvent와는 다르게 추가 행동 없이 카메라만 움직이게 하기 때문에 DoEvent만 재정의 하였다.
3. 방향키 발판
그 다음으로 만든건 다음과 같다.
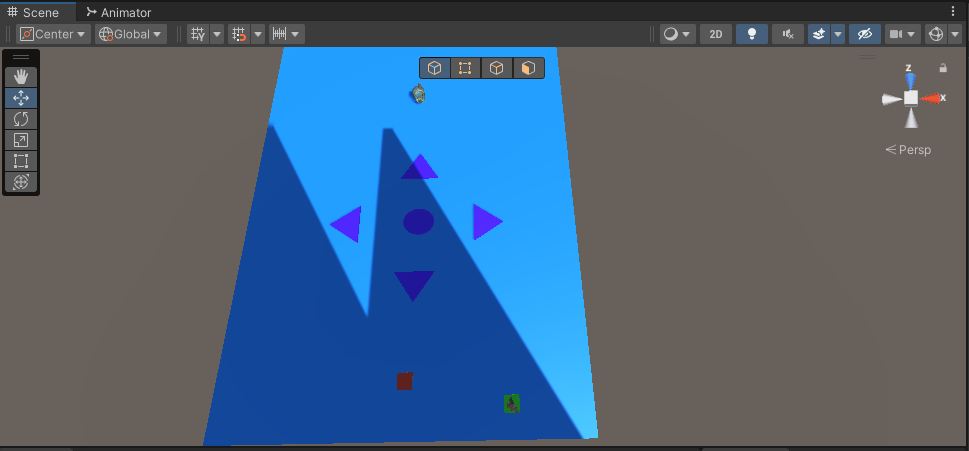
빨간색 발판을 밟으면 문제가 나오고, 해당 문제를 보고 방향키를 직접 가서 정답으로 생각되는 키들을 순서대로 밟아서 GPS아이템과 상호작용 하면 길이 생기는 기믹이다. 코드와 함께 살펴보자
using Cinemachine;
using System.Collections;
using System.Collections.Generic;
using System.Linq;
using UnityEngine;

public class GPSEvent : StageEvent
{
    [Header("상호작용에 따른 카메라 전환")]
    public CinemachineVirtualCamera cam;

    [Header("생성될 큐브")]
    public GameObject appearCube;

    [Header("입력될 발판의 방향")]
    public List<string> inputOrderDirectionList;

    //정답지(South, North, O(가운데가 원 모양), West)
    List<string> answerList = new List<string> { "S", "N", "O", "W" };

    private int eventCount = 0;

    public override void DoEvent()
    {
        if (eventCount == 0)
        {
            CheckDirection();
        }
    }

    public void MakeCube()
    {
        StartCoroutine(AppearCube(1f));
    }

    private IEnumerator AppearCube(float delay)
    {
        yield return new WaitForSeconds(delay);
        appearCube.SetActive(true);
    }

    protected override IEnumerator ChangeCamPriority(CinemachineVirtualCamera cam, int priority, float delay)
    {
        int originalPriority = cam.Priority;
        cam.Priority = priority;

        yield return new WaitForSeconds(delay * 0.5f);
        MakeCube();
        yield return new WaitForSeconds(delay * 0.5f);

        cam.Priority = originalPriority;
    }

    //제출할 방향 리스트에 넣기
    public void AddDirection(string direction)
    {
        inputOrderDirectionList.Add(direction);
    }

    //정답 확인 및 초기화
    public void CheckDirection()
    {
        if (inputOrderDirectionList.SequenceEqual(answerList))
        {
            StartCoroutine(ChangeCamPriority(cam, 200, 3));
            eventCount++;
        }
        inputOrderDirectionList.Clear();
    }
}
기본적으로 GPSEvent도 StageEvent를 상속받는다. 고로 길이 생성되는 것도 KeyEvent 에서 했던것 처럼 비슷하게 작동된다. KeyEvent에서는 텀을 두고 벽이 사라지게 만드는 반면에, GPSEvent에서는 텀을 두고 길이 생기는 거만 차이가 있다고 보면 된다.
AddDirection를 통해 DirectionStool안에 있는 방향을 List에 추가시켜주고, SequenceEqual()을 통해 두 리스트를 비교, 순서와 내용이 일치하면 true를 반환하게 하여 일치 여부를 확인한다. 한번 정답체크를 할 경우 이때까지 밟았던 발판들의 입력은 Clear() 때문에 사라진다.
using UnityEngine;

public class DirectionStool : Stool
{
    public string direction;

    protected override void OnTriggerEnter(Collider other)
    {
        if (other.gameObject.layer == LayerMask.NameToLayer("Player"))
        {
            GPSEvent gpsEvent = FindObjectOfType<GPSEvent>();
            if (gpsEvent != null)
            {
                gpsEvent.AddDirection(direction);
                Debug.Log(direction);
            }
        }
    }
}
영상을 보면 발판을 밟는 소리가 없는게 흠이긴 하지만, 해당 기능을 구현시켰다는 것에 만족했다.
4. 속도 장애물 달리기
음식 아이템을 먹으면 10초동안 스피드가 무진장 빨라지고, 레이저를 피하면서 빠르게 가야지만 도착지점에 도달할 수 있게 구성되어있다. 이건 먼저 영상을 보고 이해를 해보자.
아이템을 먹자마자 속도와 비추는 화면이 달라진다. 여기에서 고려해야 할 점이 몇가지 있다.
- 죽은 후에 버프가 없어지고 화면이 원래대로 돌아갈 것
- 레이저가 텀을 두고 데미지를 줄 것
- 아이템이 사라지지 않으므로 아이템을 계속 상호작용할 시 버프가 누적되지 말 것
먼저 레이저다.
using System.Collections;
using System.Collections.Generic;
using UnityEngine;

public class LaserObject : MonoBehaviour
{
    [Header("선 길이")]
    public float lineLength = 10f;

    [Header("피해량")]
    public int damage = 50;

    [Header("플레이어 레이어")]
    public LayerMask playerLayerMask;

    //작동 여부
    private bool isWorking = false;

    private float coolDown = 0f;

    private float coolTime = 3f;

    void Update()
    {
        Ray ray = new Ray(transform.position, - transform.right * lineLength);
        Debug.DrawRay(transform.position, - transform.right * lineLength, Color.red);

        if (Physics.Raycast(ray, lineLength, playerLayerMask) && !isWorking)
        {
            isWorking = true;
            GameManager.Instance.Player.TakeDamage(damage);
        }
        else
        {
            coolDown += Time.deltaTime;
            if(coolDown >= coolTime)
            {
                isWorking = false;
                coolDown = 0;
            }
        }
    }

}
실제로 작동 후 계산될 coolDown과 텀을 의미하는 coolTime 을 이용해 isWorking의 상태를 유동적으로 변환시켜 데미지의 작동 시간을 조절해주었다.
다음은 버프가 누적되지 않게 하기 위해서, 코드에 작동여부를 뜻하는 isWorking을 추가해 작동할 시에는 추가 작동을 방지하고자 if문으로 isWorking조건을 추가시켜주었다. 물론 버프가 자연적으로 꺼지는 경우에는 다시 false로 설정하여 버프를 다시 받을 수 있도록 하였다.
using Cinemachine;
using System.Collections;
using UnityEngine;

public class FoodCanEvent : StageEvent
{
    [Header("상호작용에 따른 카메라 전환")]
    public CinemachineVirtualCamera cam;

    //작동 여부
    private bool isWorking = false;

    //캠의 원래 우선순위
    private int originalPriority;

    private void Start()
    {
        originalPriority = cam.Priority;
    }

    public override void DoEvent()
    {
        if(!isWorking)
        {
            isWorking = !isWorking;
            GameManager.Instance.Player.onDeath += StopBuff;
            ChangeCam(cam, 200, 10f);
        }
    }

    protected override IEnumerator ChangeCamPriority(CinemachineVirtualCamera cam, int priority, float delay)
    {
        cam.Priority = priority;

        GameManager.Instance.Player.playerController.moveSpeed += GameManager.Instance.Player.itemData.ExtraSpeed;
        GameManager.Instance.Player.playerController._animator.speed *= 3;

        yield return new WaitForSeconds(delay);

        cam.Priority = originalPriority;

        GameManager.Instance.Player.onDeath -= StopBuff;
        StopBuff();
    }

    //버프 없애기
    public void StopBuff()
    {
        cam.Priority = originalPriority;
        GameManager.Instance.Player.playerController.moveSpeed -= GameManager.Instance.Player.itemData.ExtraSpeed;
        GameManager.Instance.Player.playerController._animator.speed /= 3;
        isWorking = false;
        StopAllCoroutines();
    }
}
그리고 죽고 난 뒤 버프 및 화면을 원래대로 하기 위해, Player.cs에 onDeath라는 Action을 추가시켜주어 부활할 때 해당 delegate를 실행시켜주도록 하였다.
using System;
using UnityEngine;

public class Player : MonoBehaviour
{
    public PlayerController playerController;
    public Health health;

    public ItemData itemData;
    public Action interactItem;
    public Action onDeath;

    void Awake()
    {
        GameManager.Instance.Player = this;
        playerController = GetComponent<PlayerController>();
        health = GetComponent<Health>();
    }

    private void Update()
    {
        Revive();
    }

    public void Heal(int amount)
    {
        health.Add(amount);
    }

    public void TakeDamage(int amount)
    {
        health.Subtract(amount);
        if(health.curHealth <= 0)
        {
            Revive();
        }
    }

    void Revive()
    {
        if (isFallToEnd() || health.curHealth <= 0)
        {
            transform.position = GameManager.Instance.spawnPoint;
            Heal(100);
            onDeath?.Invoke();
        }
    }

    bool isFallToEnd()
    {
        if (transform.position.y < -25f)
        {
            return true;
        }
        else
        {
            return false;
        }
    }

}
물론 해당 Action은 FoodCanEvent에서 볼 수있듯 StopBuff()함수를 추가시켜 실행시켜주었다.
오늘 정말 많은 것을 만들고 구현한것 같다. 사실상 필수에 있는 내용들도 다 했으니, 제출일(내일)가지 내가 원하는 엔딩을 고민하면서 마무리하도록 해야겠다.